Author: Javier Rodriguez, Managing Technical Architect, ePlus Technology | javier.rodriguez@eplus.com
Why This Architecture Matters Now
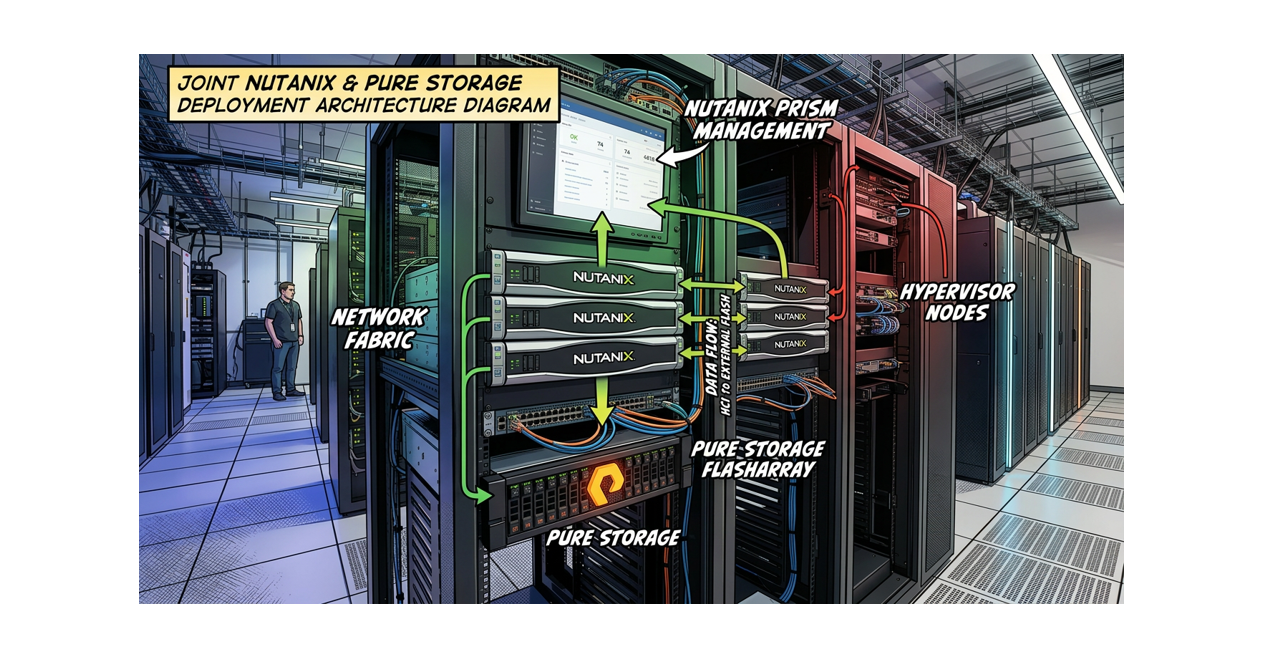
For years, Nutanix was almost synonymous with HCI, where compute and storage live together in the same nodes. That model works exceptionally well for general-purpose workloads, but it has always had a ceiling: when you need more storage capacity or performance, you also have to buy more compute, whether you need it or not.
The formal partnership between Nutanix and Pure Storage, announced at .NEXT 2025 in May, changes that equation. Nutanix AHV can now run as a compute only platform backed by Pure Storage FlashArray over NVMe/TCP. Each Nutanix AOS vDisk maps directly to a FlashArray volume, which means per VM granularity for snapshots, quality-of-service controls, and replication. You get the operational simplicity of Prism as a unified management plane while the FlashArray handles the storage heavy lifting underneath.
This post walks through what it actually takes to build that environment, based on the Cisco FlashStack with Nutanix Installation Field Guide (v1.0, December 2025) and supplemental information from Nutanix and Pure Storage documentation.
Architecture Overview
The deployment model covered here uses Cisco UCS servers (X-series, C-series, or B-series) as compute only nodes, managed by Cisco Intersight in Intersight Managed Mode (IMM). The nodes connect to Cisco UCS Fabric Interconnects (FIs), and those FIs connect upstream to top of rack switches. The Pure Storage FlashArray sits off to the side as a dedicated external storage array, connected to those same ToR switches over NVMe/TCP.
- No local storage is used for AOS datastores. The nodes are diskless or have local drives used only for the hypervisor boot.
- Storage traffic travels over dedicated VLANs and dedicated vNIC pairs, separate from management and guest VM traffic.
- The Nutanix Controller VM (CVM) on each node handles the NVMe/TCP initiator connections to the FlashArray automatically. Administrators do not need to manually configure NVMe initiators.
- Prism Central (or Prism Element) is the primary management interface for the cluster, while Cisco Intersight manages the UCS hardware layer.
Software Version Requirements
Before any hardware gets racked, confirm that all components meet the minimum software versions. Using mismatched versions is one of the most common causes of failed deployments.
| Component | Minimum Version | Notes |
|---|---|---|
| Nutanix AOS | 7.5 or later | |
| Nutanix AHV | 11.0 or later | |
| Foundation Central | 1.10 only | Do not use 2.x at this time |
| Prism Central | 7.5 or later | Required for Licensing |
| Nutanix LCM | 3.3 | Included with AOS 7.5 |
| Pure Storage Purity/FA | 6.10.3 or later | Upgrade must be done before installation begins |
| Cisco Fabric Interconnect | 4.3(4.240066) or later | |
| Cisco Intersight Virtual Appliance | 1.1.5-1 or later | Older CVA/PVA versions will cause failures |
| Cisco UCS X210c-M7 Firmware | 5.4(0.250048) or later | |
| Cisco UCS C-series M6/M7 Firmware | 4.3(6.250053) or later | |
| Cisco UCS B-series M5/M6 Firmware | 5.3(0.250021) or later |
Important: Only Foundation Central version 1.10 should be used. The Appliance VM version 2.x is explicitly not supported for this deployment type. Do not use it.
IP Address Planning
IP address planning should be completed before any configuration begins. Retrofitting addressing after the fact wastes time and introduces risk.
Infrastructure
- 2 addresses for the Fabric Interconnects
- 1 address for the Foundation Central Appliance VM
- 1 optional address for Prism Central / Foundation Central VM
Per Nutanix Host (five addresses each)
- AHV hypervisor management address
- Controller VM (CVM) management address
- CIMC management address (assigned as a pool in Intersight)
- Storage interface address, VLAN 1 (assigned as a pool in Prism Element)
- Storage interface address, VLAN 2 (assigned as a pool in Prism Element)
Pure Storage FlashArray (seven addresses)
- 1 per controller management interface
- 1 roaming array management address
- 1 per NVMe/TCP storage interface (minimum 4 across two controllers and two VLANs)
Storage addresses must be Layer 2 adjacent to the hosts and cannot traverse a router. Use two separate storage VLANs, one for the A side controller interfaces and one for the B side.
Step 1: Pure Storage FlashArray Configuration
The FlashArray setup is best done via CLI. Some configuration tasks cannot be completed through the Purity GUI. This assumes the array is already racked, cabled, powered on, and reachable on its management network, with Purity/FA 6.10.3 or later already running.
Enable and Configure NVMe/TCP Interfaces
Four Ethernet interfaces need to be assigned to NVMe/TCP. The example below uses interfaces eth10 and eth11 on each controller.
# Enable the four storage interfacespurenetwork eth enable ct0.eth10purenetwork eth enable ct0.eth11purenetwork eth enable ct1.eth10purenetwork eth enable ct1.eth11# Assign addresses, MTU 9000, and NVMe/TCP servicepurenetwork eth setattr --address 10.1.61.100/24 --mtu 9000 --servicelist nvme-tcp ct0.eth10purenetwork eth setattr --address 10.1.62.100/24 --mtu 9000 --servicelist nvme-tcp ct0.eth11purenetwork eth setattr --address 10.1.61.101/24 --mtu 9000 --servicelist nvme-tcp ct1.eth10purenetwork eth setattr --address 10.1.62.101/24 --mtu 9000 --servicelist nvme-tcp ct1.eth11
Use MTU 9000 (jumbo frames) wherever possible. If jumbo frames are not supported end to end in your network, set MTU to 1500 and ensure consistency across all components.
Create the Realm, Pod, and Administrative User
# Create the Realm for RBAC segmentationpurerealm create <realm_name># Create a Pod within the Realm for this Nutanix clusterpurepod create <realm_name>::<pod_name># Create the management access policy granting admin rights to the Realmpurepolicy management-access create --role admin --realm <realm_name> <policy_name># Create the user Nutanix will use to authenticate to the arraypureadmin create <username> --access-policy <policy_name>
Important: Set a storage quota on the Pod after creation. Without a quota, the array will not accurately report available storage to Nutanix.
Step 2: Cisco UCS and Intersight Configuration
Configure Fabric Interconnect A first via serial console or HTTPS Express Setup, setting the management mode to Intersight. After FI-A shows a login prompt, configure FI-B. FI-B will detect the peer and prompt to join the cluster.
Once the FIs are up, log into Cisco Intersight and claim the UCS domain using the Device ID and Claim Code from the FI web console. Create Resource Groups and an Organization, create and deploy a Domain Profile to the Fabric Interconnects, and set the System QoS Best Effort MTU to 9216 to allow jumbo frames.
This is where compute only Nutanix deployments require careful attention. Each server needs at least two vNIC pairs: an infrastructure pair for AHV and CVM management traffic, and a dedicated storage pair carrying the NVMe/TCP storage VLANs.
Infrastructure vNIC naming is case sensitive. Foundation Central will reject the deployment if these names are wrong. For a single VIC server use ntnx-infra-1-A on Slot MLOM, PCIe Order 0, Fabric A, Failover disabled and ntnx-infra-1-B on Slot MLOM, PCIe Order 1, Fabric B, Failover disabled.
Step 3: Foundation Central Deployment
For first-time cluster deployments with no existing Nutanix infrastructure, the Appliance VM is the simplest path. Deploy it with 2 vCPUs and 4 GB RAM with a static IP address. DHCP is not supported. Run the setup script from the local console after booting and access the GUI at https://<FC_IP>:9440.
Upload the AOS installation package, its metadata JSON file, and the AHV ISO via API calls to the Appliance VM. Retrieve the hosted file URLs by browsing to http://<FC_IP>:8053/files/images and enter those URLs into the cluster deployment wizard.
Step 4: Nutanix Cluster Deployment
Connect Foundation Central to Cisco Intersight by entering the API Key ID and Secret Key under Settings. The API key user must have at minimum Server Administrator privileges in the relevant Intersight Organization.
- Onboard the Cisco UCS servers by selecting Intersight Managed Mode and choosing the target nodes
- Select the onboarded nodes and click Create Cluster
- Select Compute Cluster (not HCI Cluster, since there is no local storage)
- Configure the infrastructure vNIC pair and at least one dedicated storage vNIC pair
- Assign IP addresses and hostnames. Use Bulk Configuration to set sequential addresses efficiently
- Enter the download URLs for AOS, the AOS metadata file, and the AHV ISO
- Set NTP servers, DNS servers, and timezone
- Select the Foundation Central API Key and click Create Deployment
Deployments without firmware changes typically complete in 75 to 90 minutes. If firmware upgrades are required, add 60 to 90 minutes.
Step 5: External Storage Connectivity
After the Nutanix cluster is up and accessible in Prism Element, select I’ll Do This Later when prompted to set up external storage. The virtual switch configuration must be done first.
- Edit the default virtual switch
vs0to remove any storage vNICs, leaving only the infrastructure vNIC pairs as uplinks - Create a new dedicated storage virtual switch, assign it the storage vNIC pair, set MTU to 9000, and Bond Type to Active-Active with MAC pinning
- Create one External Storage Interface per storage VLAN, associated with the new storage virtual switch, with an IP pool large enough for one address per node plus room for growth. Enable the External Storage option and set MTU to 9000.
Before attaching the array, verify jumbo frame connectivity from the CVMs to all four FlashArray storage interfaces:
ping -M do -s 8972 10.1.61.100ping -M do -s 8972 10.1.62.100ping -M do -s 8972 10.1.61.101ping -M do -s 8972 10.1.62.101
All four tests should complete with 0% packet loss. From Prism Element, click Attach External Storage, select Pure Storage FlashArray, enter the clustered management IP, the Realm administrative username and password, select the Realm and Pod, and click Attach. The connection typically completes within 30 to 60 seconds.
Step 6: Post-Installation Tasks
Change the default passwords on three accounts on AHV (root, admin, and nutanix) and on the CVM nutanix account. Run the NCC password health check after: ncc health_checks system_checks default_password_check
Run a full NCC health check from Prism Element and resolve all failures and warnings before the cluster goes into production. LCM 3.3 ships with AOS 7.5. Run an inventory job to see available Nutanix software updates. Note that LCM will not perform server firmware updates for compute only nodes connected to external storage.
Things Worth Calling Out
vNIC naming. The ntnx-infra-1-A and ntnx-infra-1-B names in the LAN Connectivity Policy are case sensitive. A single capitalization error will cause the deployment to fail at validation. Fix it in the Intersight policy and resubmit.
Foundation Central version. Version 1.10 only. The Appliance VM version 2.x exists and is available, but it does not work with Cisco UCS hardware in this context. Do not use it.
Jumbo frames. The MTU 9000 setting at the vNIC level and the virtual switch level only permits jumbo frames to pass; it does not enforce them. All switching infrastructure between the hosts and the FlashArray interfaces must also support 9000 byte frames. Use the ping test above to verify before attaching the array.
Storage VLAN design. Use two separate storage VLANs, one for the A side controller interfaces and one for the B side. Storage addresses within each VLAN must be in the same Layer 2 domain as the hosts and cannot be routed.
Pod quota. Without setting a storage quota on the Pure Storage Pod, Nutanix will not accurately display available storage capacity. Set it immediately after verifying the Realm and Pod are created.
Summary
The Nutanix AHV compute only model backed by Pure Storage FlashArray over NVMe/TCP represents a meaningful shift in how converged infrastructure is deployed. It separates the scaling concerns for compute and storage, delivers per VM storage granularity at the array level, and maintains a single management plane through Prism for day to day operations.
The installation process involves more moving parts than a traditional HCI cluster. Cisco Intersight, Foundation Central, Purity CLI, and Prism Element all play distinct roles, and the sequencing matters. Following the steps in order and confirming each layer before moving to the next is the most reliable path to a successful deployment.
For questions about this architecture or assistance planning a deployment, reach out at javier.rodriguez@eplus.com.
Leave a Reply